Call or WhatsApp +923000113866
Email us: info@vamatters.com
A Guide to DMARC, SPF, and DKIM Implementation
"Demystifying DMARC, SPF, and DKIM Setup for Seamless Protection. Dive into our comprehensive guide to effortlessly safeguarding your emails while enhancing deliverability and trust."
Introduction
Introduction
Securing your organization's email infrastructure is paramount in today's digital landscape, where cyber threats loom large and data privacy concerns continue to escalate. In this comprehensive guide, we delve into the intricate yet indispensable world of email setup, demystifying essential protocols such as DMARC, DKIM, and SPF. Whether you're a seasoned IT professional or a business owner looking to fortify your communication channels, understanding these protocols is crucial for ensuring the authenticity, integrity, and deliverability of your emails. Join us as we navigate through the intricacies of email configuration, unraveling the complexities of DMARC, DKIM, and SPF to empower you with the knowledge and tools necessary to safeguard your organization's email ecosystem.

Securing your organization's email infrastructure is paramount in today's digital landscape, where cyber threats loom large and data privacy concerns continue to escalate. In this comprehensive guide, we delve into the intricate yet indispensable world of email setup, demystifying essential protocols such as DMARC, DKIM, and SPF. Whether you're a seasoned IT professional or a business owner looking to fortify your communication channels, understanding these protocols is crucial for ensuring the authenticity, integrity, and deliverability of your emails. Join us as we navigate through the intricacies of email configuration, unraveling the complexities of DMARC, DKIM, and SPF to empower you with the knowledge and tools necessary to safeguard your organization's email ecosystem.

Email Set-up
Email Set-up
Step 1: Navigate to Email Service Setup
Within the settings section, look for the option specifically related to setting up the email service.
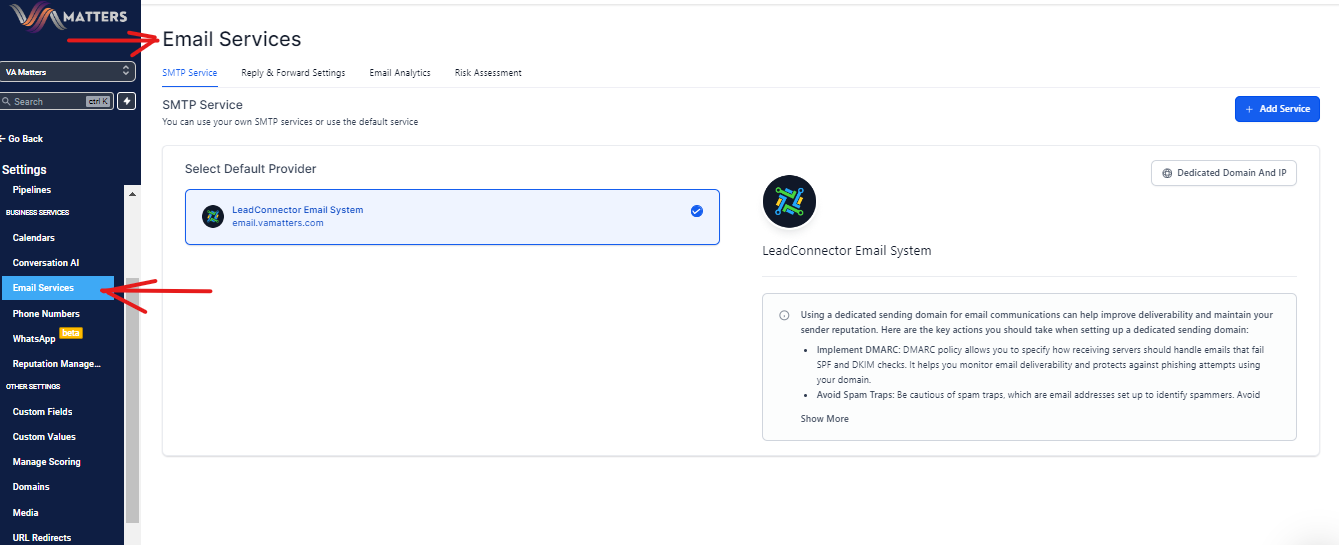
Step 1: Navigate to Email Service Setup
Within the settings section, look for the option specifically related to setting up the email service.

Step 2: Additional Steps for Setting Up Dedicated Domain
Setting up a dedicated domain for sending emails in GoHighLevel requires additional configuration steps
compared to using default email settings.
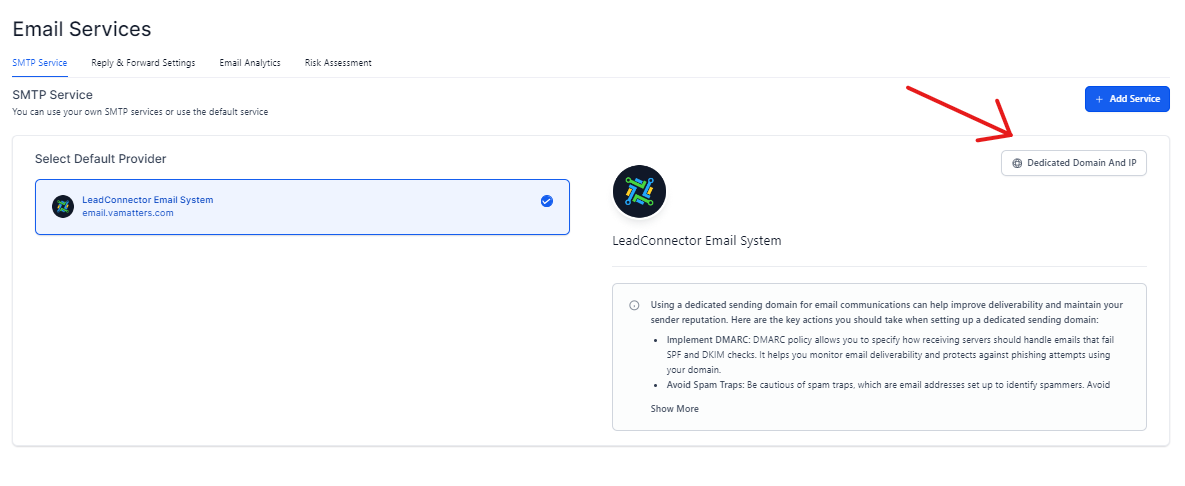
Click on the dedicated domain button for adding a new domain
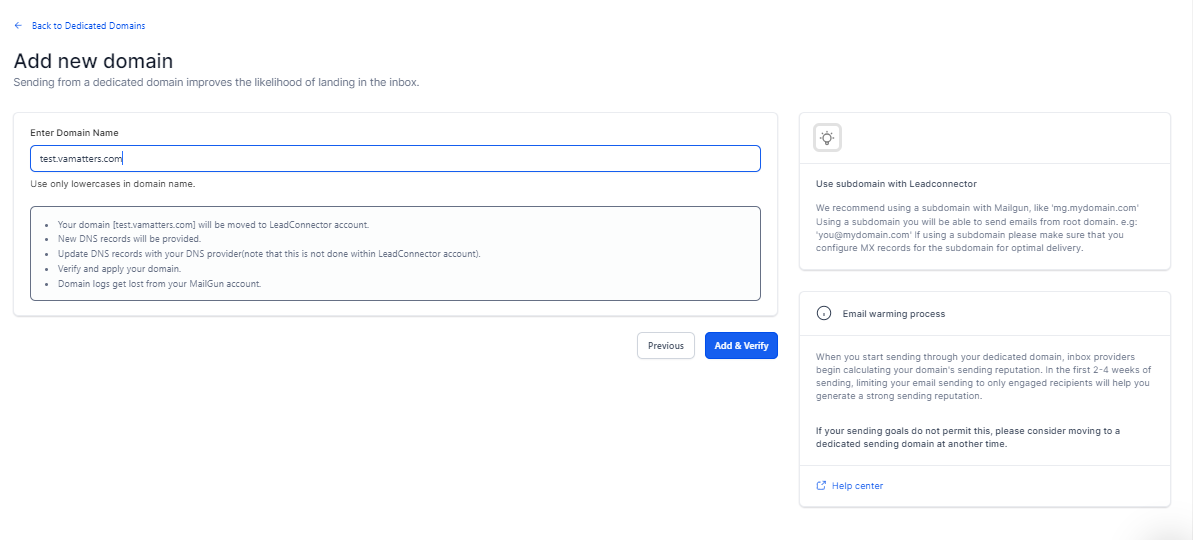
Add your domain and click on add and verify button
Step 2: Additional Steps for Setting Up Dedicated Domain
Setting up a dedicated domain for sending emails in GoHighLevel requires additional configuration steps
compared to using default email settings.
Click on the dedicated domain button for adding a new domain

Add your domain and click on add and verify button

Step 3(a): Adding DNS Records
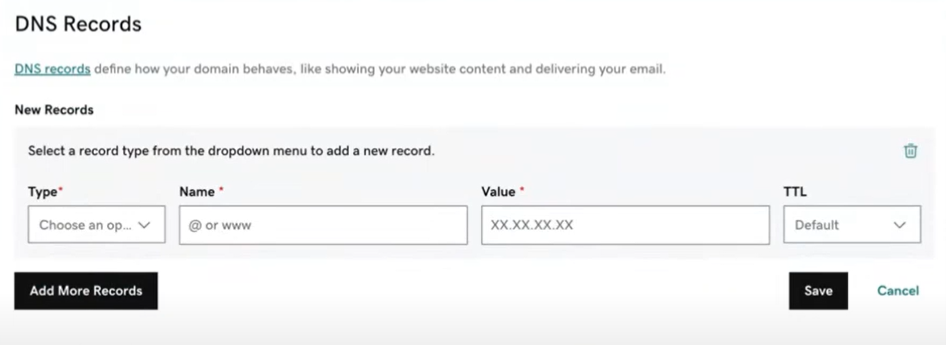
Log in to your DNS hosting provider's website. This is where you manage your domain's DNS settings.
Locate the option to add a new DNS record, often found in the DNS management or domain settings section.
Add a new text record with the details provided by GoHighLevel for domain verification.
This usually involves entering a specific name and value provided by GHL.
Save the changes to add the text record
Note:
Some DNS hosts may require additional steps for domain verification.
Follow any instructions provided by GHL or your DNS host to complete the verification process.
Step 3(a): Adding DNS Records
Log in to your DNS hosting provider's website. This is where you manage your domain's DNS settings.
Locate the option to add a new DNS record, often found in the DNS management or domain settings section.
Add a new text record with the details provided by GoHighLevel for domain verification.
This usually involves entering a specific name and value provided by GHL.
Save the changes to add the text record

Note:
Some DNS hosts may require additional steps for domain verification.
Follow any instructions provided by GHL or your DNS host to complete the verification process.
Step 3(b): Add Text Record for Domain Verification
Add a new text (TXT) record with the name and value provided by GoHighLevel for domain verification.
Save the changes to add the text record.
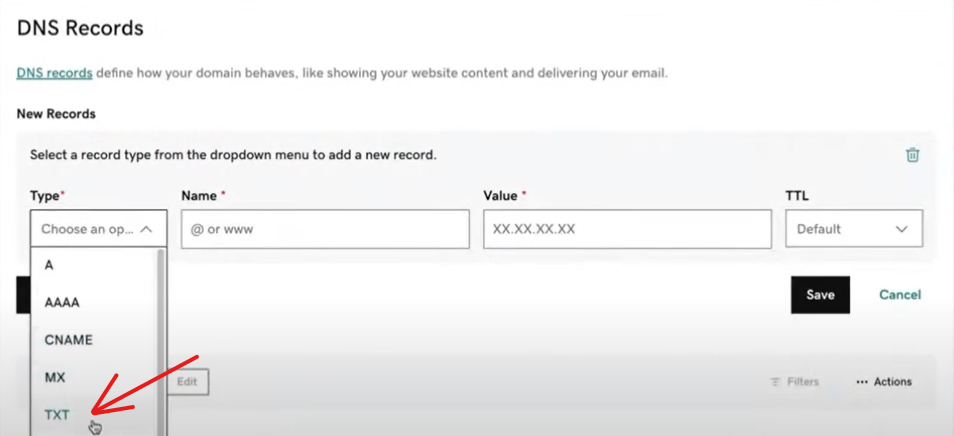
Step 3(b): Add Text Record for Domain Verification
Add a new text (TXT) record with the name and value provided by GoHighLevel for domain verification.
Save the changes to add the text record.

Step 4: Add CNAME Record for Email Routing
In your DNS hosting provider's dashboard, find the option to add a new DNS record.
Add a new CNAME record with the details provided by GHL for email routing.
Save the changes to add the CNAME record.
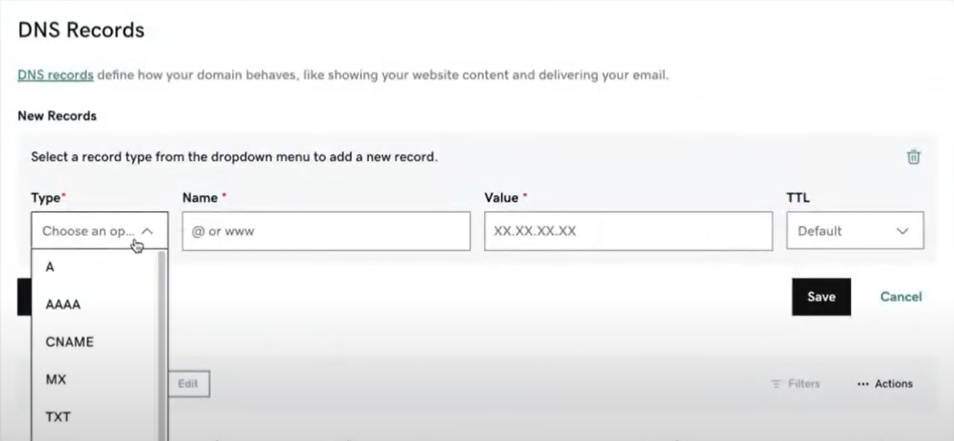
Step 4: Add CNAME Record for Email Routing
In your DNS hosting provider's dashboard, find the option to add a new DNS record.
Add a new CNAME record with the details provided by GHL for email routing.
Save the changes to add the CNAME record.

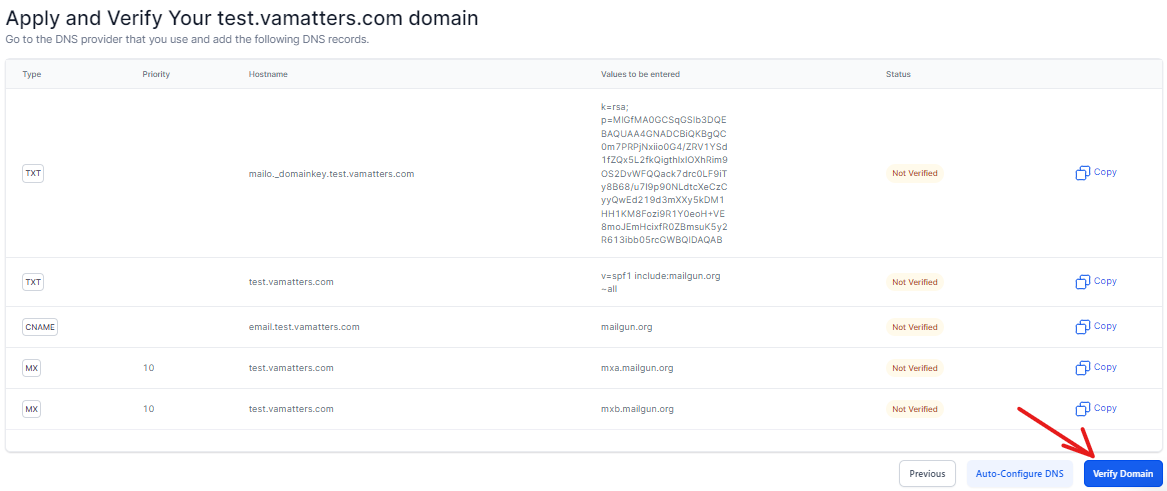
Step 5: Add MX Records for Incoming Emails
Add two MX (Mail Exchange) records with the values provided by GHL for incoming emails.
Save the changes to add the MX records.

Step 5: Add MX Records for Incoming Emails
Add two MX (Mail Exchange) records with the values provided by GHL for incoming emails.
Save the changes to add the MX records.

Step 6: Verify Domain and Activate Email Service
Return to the GoHighLevel dashboard or email setup section.
Follow the instructions provided to verify the domain and activate the email service.
This may involve clicking a verification link or button within your GHL account.
Following these detailed instructions ensures that you correctly set up and configure your email service, including the setup of a dedicated domain, in GoHighLevel.

DMARC Set-up
DMARC Set-up
Step 1: Ensure Valid SPF and DKIM Records
Before creating your DMARC record, ensure that you have valid SPF (Sender Policy Framework) and DKIM (DomainKeys Identified Mail) records set up in your domain's DNS settings. These records help authenticate your email messages and are prerequisites for DMARC.
Step 2: Creating the DMARC Record
Type: TXT
Host: _dmarc.yourdomain.com
Value:
v=DMARC1; p=quarantine; rua=mailto:dmarc@yourdomain.com; ruf=mailto:dmarc@yourdomain.com; sp=quarantine; fo=1;
Step 2: Creating the DMARC Record
Type: TXT
Host: _dmarc.yourdomain.com
Value:
v=DMARC1;p=quarantine;rua=mailto:dmarc@yourdomain.com;ruf=mailto:dmarc@yourdomain.com; sp=quarantine; fo=1;
Step 3: Understanding the DMARC Record Components
v=DMARC1: Indicates the version of DMARC being used. Currently, "DMARC1" is the only version available.
p=quarantine: Specifies the policy applied to emails that fail DMARC authentication. In this case, "quarantine" means that such emails will be treated suspiciously, often being placed in the spam or junk folder.
rua=mailto:dmarc@yourdomain.com: Specifies the address for aggregate reports. Aggregate reports provide a summary of all emails sent from your domain, indicating which messages passed or failed DMARC checks. Reports will be sent to the specified email address.
ruf=mailto:dmarc@yourdomain.com: Specifies the address for forensic reports. Forensic reports provide detailed information about individual emails that fail DMARC checks. Reports will also be sent to the specified email address.
sp=quarantine: Specifies the DMARC policy for subdomains of the domain. In this case, the same "quarantine" policy is applied to emails from any subdomains.
fo=1: Defines the conditions under which forensic reports should be sent. "1" means that reports are generated for messages failing DMARC authentication and not aligning with the domain in the "From:" header address.
Step 4: Summary of DMARC Record Setup
In summary, this DMARC record requests that emails failing DMARC checks be quarantined, sends both aggregate and forensic reports to dmarc@yourdomain.com, applies the same policy to subdomains, and specifies the condition for sending forensic reports.
This setup helps domain owners monitor and protect their domains from email misuse. By following these steps and understanding the components of the DMARC record, you can effectively set up DMARC for your domain to enhance email security and trustworthiness.
Setting Up SPF (Sender Policy Framework) for Outgoing Communication
Setting Up SPF (Sender Policy Framework) for Outgoing Communication
Step 1: Access Your DNS Settings
Log in to your DNS hosting provider's website or control panel where you manage your domain's DNS
settings.
Step 1: Access Your DNS Settings
Log in to your DNS hosting provider's website or control panel where you manage your domain's DNS settings.
Step 2: Locate the DNS Records Section
Navigate to the section within your DNS settings where you can add or edit DNS records. This is typically
labeled as "DNS Records," "DNS Management," or something similar.

Step 2: Locate the DNS Records Section
Navigate to the section within your DNS settings where you can add or edit DNS records. This is typically
labeled as "DNS Records," "DNS Management," or something similar.

Step 3: Add a TXT Record for SPF
Look for an option to add a new DNS record, and select the type as "TXT."In the "Name" or "Host" field, enter
your domain or sub-domain.
For example, if you're setting up SPF for a sub-domain like mail.yourdomain.com, enter "mail" in the name field.
In the "Value" or "Data" field, input the SPF record provided, which should resemble:
v=spf1include:mailgun.orginclude:leadconnectorhq.cominclude:replies.leadconnectorhq.cominclude:mail.yourdomain.cominclude:replies.mail.yourdomain.com ~all
Step 3: Add a TXT Record for SPF
Look for an option to add a new DNS record, and select the type as "TXT". In the "Name" or "Host" field, enter your domain or sub-domain.
For example, if you're setting up SPF for a sub-domain like mail.yourdomain.com, enter "mail" in the name field.
In the "Value" or "Data" field, input the SPF record provided, which should resemble:
v=spf1include:mailgun.orginclude:leadconnectorhq.cominclude:replies.leadconnectorhq.cominclude:mail.yourdomain.cominclude:replies.mail.yourdomain.com ~all
Step 4: Understanding the SPF Record Components
v=spf1: Indicates the version of SPF being used.
include:mailgun.org, include:leadconnectorhq.com, include:replies.leadconnectorhq.com: Specifies trusted sources permitted to send emails on behalf of your domain. These may include email service providers or other trusted sources.
include:mail.yourdomain.com, include:replies.mail.yourdomain.com: Includes your domain or sub-domain as trusted sources for sending emails.
~all: Specifies the default action for email servers that aren't explicitly listed in the SPF record. In this case, "˜all" indicates that all other servers should "soft fail," meaning they are not explicitly allowed but are not immediately rejected either.
Step 4: Understanding the SPF Record Components
v=spf1: Indicates the version of SPF being used.
include:mailgun.org,include:leadconnectorhq.com,include:replies.leadconnectorhq.com: Specifies trusted sources permitted to send emails on behalf of your domain. These may include email service providers or other trusted sources.
include:mail.yourdomain.com,include:replies.mail.yourdomain.com: Includes your domain or sub-domain as trusted sources for sending emails.
~all: Specifies the default action for email servers that aren't explicitly listed in the SPF record. In this case, "˜all" indicates that all other servers should "soft fail," meaning they are not explicitly allowed but are not immediately rejected either.
Step 5: Save Changes
Once you've entered the SPF record, save the changes to update your DNS settings.
Step 5: Save Changes
Once you've entered the SPF record, save the changes to update your DNS settings.
Step 6: Verify SPF Configuration
After saving the changes, wait for the DNS changes to propagate, which may take some time (usually up to 48 hours). Use SPF checking tools or services to verify that the SPF record is correctly configured for your domain. You can find SPF checking tools online that analyze your SPF record and provide feedback on its validity. By following these steps, you can properly set up SPF for outgoing communication from your domain or sub-domain, ensuring that emails are sent securely and authenticated by trusted sources.
DKIM set-up
DKIM set-up
Step 1: Generating DKIM Keys
Look for the option to generate DKIM keys within the email configuration settings.
Click on the option to generate DKIM keys for your domain.
Step 1: Generating DKIM Keys
Look for the option to generate DKIM keys within the email configuration settings.
Click on the option to generate DKIM keys for your domain.
Step 2: Selecting Domain
If you have multiple domains linked to your GHL account, select the specific domain for which you want to
set up DKIM authentication.
Step 2: Selecting Domain
If you have multiple domains linked to your GHL account, select the specific domain for which you want to
set up DKIM authentication.
Step 3: Copying DKIM Keys
After generating DKIM keys, you'll be provided with a public key and a private key. Carefully copy the public
key provided, as you'll need to add it to your domain's DNS settings shortly.
Step 3: Copying DKIM Keys
After generating DKIM keys, you'll be provided with a public key and a private key. Carefully copy the public
key provided, as you'll need to add it to your domain's DNS settings shortly.
Step 4: Adding DKIM Record to DNS
Now, log in to your DNS hosting provider's website or control panel.
Navigate to the DNS settings section for the domain you've selected earlier.
Step 4: Adding DKIM Record to DNS
Now, log in to your DNS hosting provider's website or control panel.
Navigate to the DNS settings section for the domain you've selected earlier.
Step 5: Creating DKIM TXT Record
Add a new TXT record to your DNS settings.
In the "Name" or "Host" field, enter the selector followed by ._domainkey.
Save the changes to add the DKIM TXT record to your domain's DNS settings.
For example, if the selector is "s1," the name would be s1._domainkey.In the "Value" or "Data" field, paste the DKIM public key provided by GoHighLevel.
Step 6: Verifying DKIM Configuration
Return to the GoHighLevel dashboard after adding the DKIM TXT record to your DNS settings.
Look for an option to verify DKIM configuration or perform a DKIM test.
Follow the provided instructions to complete the verification process.
Step 6: Verifying DKIM Configuration
Return to the GHL dashboard after adding the DKIM TXT record to your DNS settings.
Look for an option to verify DKIM configuration or perform a DKIM test.
Follow the provided instructions to complete the verification process.
Step 7: Activating DKIM Authentication
Once DKIM verification is successful, activate DKIM authentication for your domain within the GoHighLevel
email settings.
Save the changes to apply DKIM authentication to your outgoing emails.
Step 7: Activating DKIM Authentication
Once DKIM verification is successful, activate DKIM authentication for your domain within the GHL email settings.
Save the changes to apply DKIM authentication to your outgoing emails.
Step 8: Monitoring DKIM Authentication
Regularly monitor DKIM authentication status within the GoHighLevel dashboard.
Keep an eye on any notifications or alerts related to DKIM authentication to ensure smooth operation.
By meticulously following these steps, you can seamlessly set up DKIM authentication for your domain in GoHighLevel, bolstering the security and legitimacy of your outgoing emails.
Got questions about email setup, DMARC, DKIM, or SPF? Feel free to reach out!

Subscribe to our social
We’re on a mission to build a better future where technology creates good jobs for everyone.
© Copyright 2024. VA Matters (SMC-PRIVATE) Limited. All rights reserved.


